Would you like to make this site your homepage? It's fast and easy...
Yes, Please make this my home page!

Now
that you've made a Web page using Adobe PageMill, you are ready
to upload, or publish, it to the Internet. When you upload Web
pages, you are transferring copies of your Web pages to a large
computer known as a server.
Once on a server, your files can be accessed from anywhere in
the world as long as someone has a computer and an Internet connection.
PageMill can be used to upload your Web pages to the Internet.
Uploading your Web pages you've composed on your hard drive to
the Internet varies depending on your Internet Service Provider
(ISP). ISPs, such as Earthlink,
AOL, and Pacific
Bell, usually provide you with a set amount of Web space for
your personal home pages. How much Web space you're allotted depends
on your ISP. Generally, 3 to 6 MB (megabytes) of Web space is
the norm. There are also many free Web hosts out in the World
Wide Web offering free unlimited Web space!
Key
Information You Need Before Uploading your Web Pages
- Now that you've used
PageMill to make a Web page on your hard drive, the next step
is to make sure you have all the details you need to upload your
Web page to the Web host's server.
-
- You'll need the following
information:
- Your ISP User ID (to
enter in the User
name field)
- Your ISP Password
(to enter in the Password field)
- The upload location
of your ISP (to enter in the Host Name [FTP or HTTP] field)
- You should be able
to obtain all this information by contacting your Internet Service
Provider.
<TOP>
Uploading
a Web Page to your ISP
- Be sure you have the
key information mentioned above before you proceed to this step.
To upload your Web page, open the page you want to upload. Uploading
a page uploads that page along with any files associated with
it, such as graphics. Click the File menu, then click Upload-->Page. If PageMill can't find any
site settings for this file, it lets you create
a new site for the upload.
<TOP>
Creating
a New Site
- To create a new site,
click the File menu, then click New-->New
Site.... A
New
Site dialog
box will open.
-
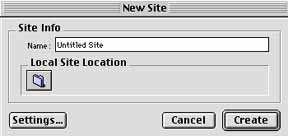
-
- Enter the name of
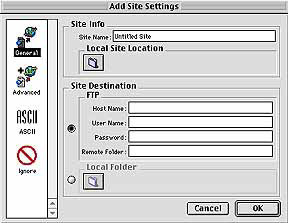
your Website, then click the Settings... button. An Add Site Settings dialog box will appear.
-
-
- Enter the name of
your Website in the Site Name field.
- Click on the Local Site
Location
to locate and select the folder on your hard drive containing
your Website files.
- Enter the upload location
of your ISP in the Host Name [FTP or HTTP] field.
- Enter our ISP User
ID in the User
name field.
- Enter ISP Password
in the Password field.
- Again, you should
be able to obtain all this information by contacting your Internet
Service Provider. Click OK
when you are finished specifying the upload settings.
<TOP>
-
Editing
Site Settings
- Once you've specified
the site settings for a site, you don't have to redo them unless,
for example, you need to make changes to the URL of the destination
site. To edit the site settings for a site, click the Site menu, then click Show Settings.... Double-click on the name
of your site to select and open the site settings for your site.
Click the General icon and re-enter the information
as stated above. Click OK
when you are done editing the site settings.
<TOP>
Uploading
an Entire Website
- With PageMill, you
can also upload entire Websites at once. To upload a Website
after you've loaded it (click File menu and click Open-->Site Name), click the Site menu, then click Upload. To cancel the uploading process,
simply press the Stop button on the progress bar
that appears, or type "APPLE"+"."
<TOP>
Back
to PageMill Introduction Topics Index