Would you like to make this site your homepage? It's fast and easy...
Yes, Please make this my home page!

Tables
that can help organize complicated data into easily understandable
information. With Netscape Composer, adding a graphical table
to your Web page can be as easy as clicking a button. Inserting
tables in your Web page can give your page a more organized look.
Inserting a Table
Modifying the
Appearance of a Table
Inserting a Table
Inserting
a Table
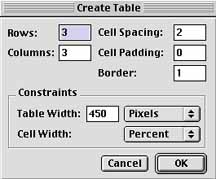
- To insert a table
into your Web page, click the Table button
 found on the toolbar. This will open a Create Table dialog box as seen below.
-
-
- Here, you can specify
the layout for your table, such as the number of rows and columns,
border line width, amount of pixel spacing between cells and
pixel padding within cells, table width and height. It is recommended
that you play around with these settings to get a feel of what
your table may look like. Don't worry, you can't hurt the computer
by experimenting with tables! When you are finished specifying
the table dimensions, click the OK button to insert your table.
Below is an example
of a simple table that has two rows and two columns, displaying a total of four
cells.
|
First Cell |
Second Cell |
|
Third Cell |
Fourth Cell |
<TOP>
Deleting
a Table
- To delete the table
that you've just created, click your cursor
 on outer border of the table
to select it, then press "DELETE".
on outer border of the table
to select it, then press "DELETE".
<TOP>
Resizing
a Table
- To resize a table
you've just created, click your cursor
on outer border of the table to select it. You will see a black
outline around the entire table. To resize the table, simply
click on the resize handles (black squares) and drag.
<TOP>
Entering
Text in the Cells
- After you've created
the table, you can begin to enter the data into the cells. First,
place your cursor on
a cell that you're going to type in and click to select it. Next,
click on the appropriate Paragraph Alignment button
 on the toolbar for left, center, or right
alignment to select where you want the text to be aligned within
the cell. Finally, type in the data. To advance to another cell,
simply press the "TAB" key on your keyboard or place
your cursor over the appropriate cell and click.
on the toolbar for left, center, or right
alignment to select where you want the text to be aligned within
the cell. Finally, type in the data. To advance to another cell,
simply press the "TAB" key on your keyboard or place
your cursor over the appropriate cell and click.
<TOP>
Specifying the
Appearance of a Table
Adding
a Table Border
- It is easy to alter
the appearance of a table by specifying the size of a table border.
To create a table border, click the Table button on the toolbar to open the Create Table dialog box. Find the Border field, and type in a numeric
value (i.e. 0-10) to increase or decrease the table border width.
The default is 1 pixel. . Click the OK button to insert your table with a table
border. The figure below should give you a better idea about
table borders.
|
0 pixels |
1 pixels |
5 pixels |
10 pixels |
<TOP>
Controlling
Cell Spacing
- Cell space is the
amount of space inserted between table cells. Varying the cell
spacing can affect a table's appearance. To specify the cell
spacing, click the Table
button
on the toolbar to open the Create Table dialog box. Locate the Cell Spacing field, and type in a numeric
value (i.e. 0-10) to increase or decrease the cell spacing. The
default is 1 pixel. Click the OK button to insert your table. The figure
below demonstrates how different cell spacing values affect a
table's appearance.
|
0 pixels |
1 pixels |
5 pixels |
10 pixels |
<TOP>
Controlling
Cell Padding
- Increasing or decreasing
cell padding, the space between the table text and the cell borders,
can also modify the appearance of a table. To control the cell
padding, click the Table
button
on the toolbar to open the Create Table dialog box. Find the Cell Padding field, and type in a numeric
value (i.e. 0-10) to increase or decrease the cell padding. The
default is 1 pixel. Click the OK button to insert your table. As you
can see below, cell padding values can also affect a table's
appearance.
|
0 pixels |
1 pixels |
5 pixels |
10 pixels |
<TOP>
Aligning
a Table on a Page
- By specifying the
table alignment on a page, you control where you want your table
to appear on the page. You can choose from Left, Center, and
Right alignment for your table. After you've created
your table, click your cursor
on outer border of the table to select it. Next, click on the
appropriate Paragraph
Alignment
button
on the toolbar for left, center, or right alignment to select
where you want the table to be aligned on the page.Your new table
will be aligned on the page according to your selection.
<TOP>
Specifying
the Table Size
- You can easily dictate
the size of your table. To specify the table size, click the
Table button on the toolbar to open the Create Table dialog box. Find the Table Width field, select either pixels
or percent (of window), then type in a numeric value (i.e. 0-100)
to maximize or minimize the table. The default is 450 pixels.
Click the OK button to insert your table.
<TOP>
Back
to PageMill Introduction Topics Index